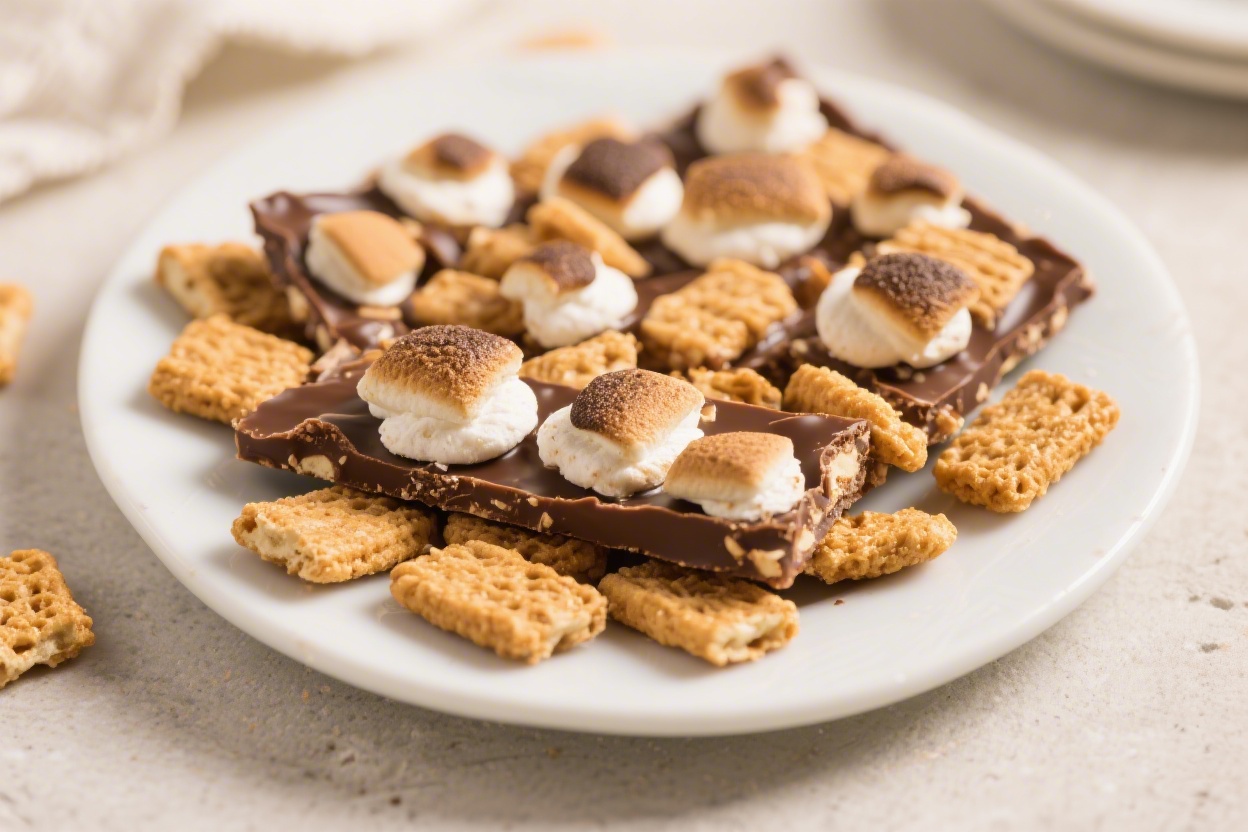
If you love the classic campfire s’more but want something faster and less messy, this bark is a game changer. It’s crunchy, gooey, and chocolatey with just the right hit of toasted marshmallow flavor. Best of all, it’s no bake and comes together in minutes.
Make it for parties, movie nights, or when a craving strikes. You only need a few simple ingredients and a baking sheet.
Contents
- 1 Why This Recipe Works
- 2 Shopping List
- 3 Step-by-Step Instructions
- 4 Storage Instructions
- 5 Benefits of This Recipe
- 6 Common Mistakes to Avoid
- 7 Variations You Can Try
- 8 FAQ
- 8.1 Can I use only one type of chocolate?
- 8.2 How can I melt chocolate without a microwave?
- 8.3 Do I have to add oil to the chocolate?
- 8.4 My bark is crumbling—what went wrong?
- 8.5 Can I make this ahead?
- 8.6 How do I get clean, even pieces?
- 8.7 What if I don’t have Golden Grahams?
- 8.8 Can I add more marshmallows on top?
- 8.9 Is there a dairy-free option?
- 8.10 How thick should the bark be?
- 9 In Conclusion
Why This Recipe Works
This recipe takes everything you love about s’mores and turns it into a simple slab of candy you can break into pieces. The mix of semisweet chocolate and a little milk chocolate gives balanced sweetness without being cloying.
Golden Grahams cereal adds the classic graham cracker taste, plus crunch that holds up well. Mini marshmallows are folded in at the right time so they stay soft and pillowy. A quick chill sets the bark fast, so you can eat it within the hour.
Shopping List
- Semisweet chocolate chips (about 2 cups / 12 ounces)
- Milk chocolate chips (about 1 cup / 6 ounces)
- Vegetable oil or coconut oil (1–2 teaspoons, optional for smoother melting)
- Golden Grahams cereal (3–4 cups)
- Mini marshmallows (2–3 cups)
- Flaky sea salt (a pinch, optional but recommended)
- Optional add-ins/toppings: mini chocolate chips, crushed graham crackers, white chocolate drizzle
- Nonstick spray or parchment paper for lining the pan
Step-by-Step Instructions
- Prep your pan. Line a rimmed baking sheet (about 10×15 inches) with parchment paper.Lightly spritz with nonstick spray if you want easy release.
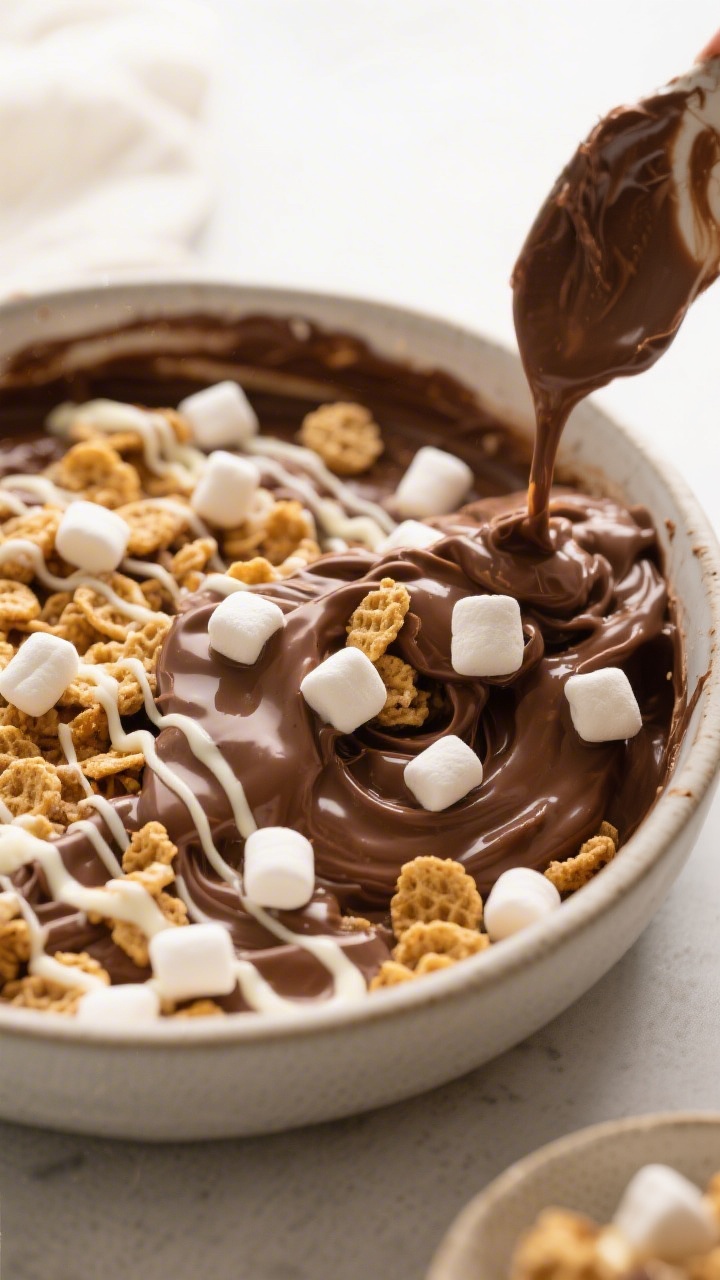
- Melt the chocolate. Add semisweet and milk chocolate chips to a microwave-safe bowl. Microwave in 20–30 second bursts, stirring between each, until smooth. If the chocolate seems thick, stir in 1–2 teaspoons of oil for silkier texture.You can also melt using a double boiler on the stovetop.
- Reserve a little for drizzling. If you like a pretty finish, scoop out 2–3 tablespoons of melted chocolate and set aside for a final drizzle.
- Fold in the cereal. Gently stir 3 cups of Golden Grahams into the melted chocolate. Coat evenly. If you want more crunch, add up to 1 extra cup, stopping before the chocolate can no longer coat it well.
- Add marshmallows last. Let the chocolate mixture cool for 2–3 minutes so it’s warm, not hot.Fold in 2 cups of mini marshmallows. This keeps them from melting completely and helps them stay defined and gooey.
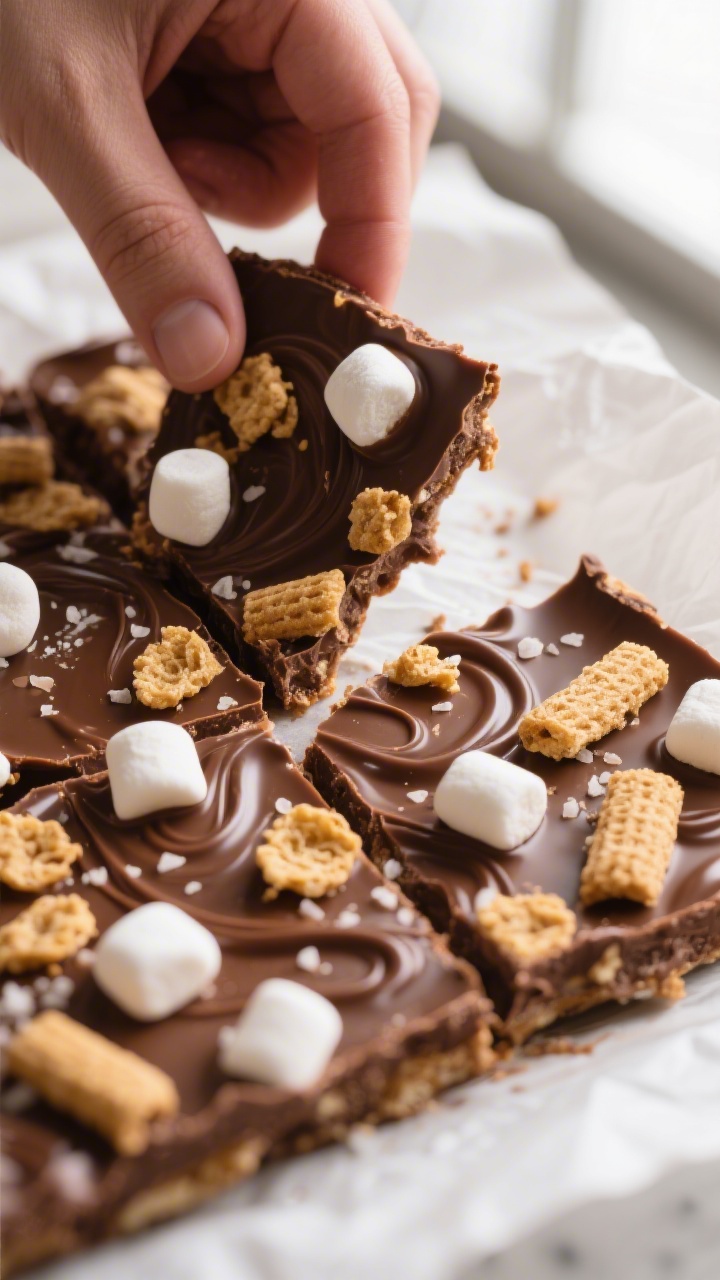
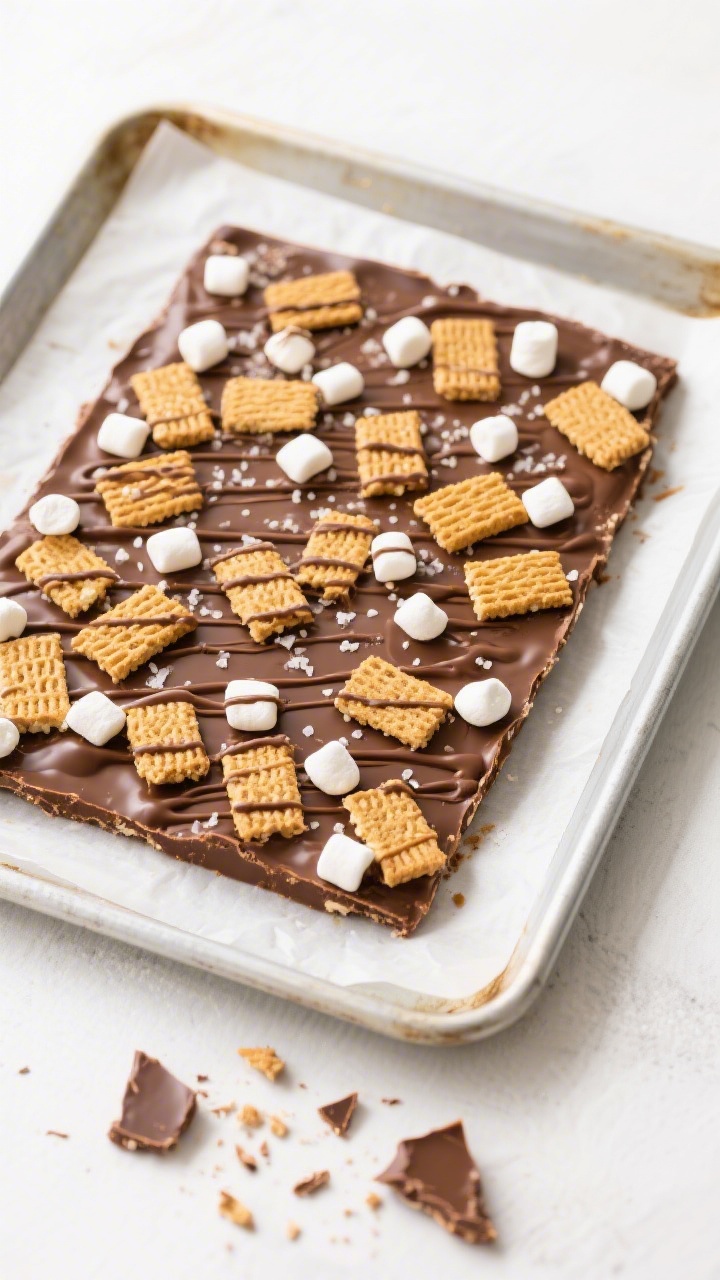
- Spread the mixture. Pour the mixture onto the lined baking sheet. Use a spatula to spread it into an even layer about 1/2 inch thick.Aim for an irregular edge—it looks rustic and fun.
- Top it off. Press a handful of extra Golden Grahams and marshmallows on top for texture. Drizzle with the reserved melted chocolate. Sprinkle a pinch of flaky sea salt if using—it sharpens the chocolate and balances sweetness.
- Chill to set. Place the pan in the fridge for 20–30 minutes, or until firm.If your kitchen is cool, you can leave it at room temperature for 60–90 minutes.
- Break and serve. Lift the bark out by the parchment. Use your hands or a sharp knife to break it into pieces. Serve immediately or store as directed below.
Storage Instructions
Store the bark in an airtight container at room temperature for up to 4 days if your home is cool and dry.
If it’s warm or humid, refrigerate it so the chocolate doesn’t soften. For longer storage, freeze pieces in a sealed container for up to 2 months. Separate layers with parchment to prevent sticking.
Let frozen bark sit at room temperature for 10–15 minutes before eating for the best texture.
Benefits of This Recipe
- No oven needed: Perfect for hot days or busy schedules.
- Fast: From start to snack in under an hour, including chill time.
- Crowd-pleasing flavors: Chocolate, graham, and marshmallow never miss.
- Customizable: Easy to adapt for dietary needs or flavor twists.
- Portable: Great for potlucks, road trips, or lunchbox treats.
Common Mistakes to Avoid
- Overheating the chocolate: This can seize or burn it. Use short microwave bursts and stir well.
- Adding marshmallows to hot chocolate: They’ll melt and disappear. Let the chocolate cool a bit first.
- Too much cereal: If you overload the mix, there won’t be enough chocolate to bind everything and the bark will crumble.
- Skipping parchment paper: The bark will stick to the pan and break unevenly.
- Rushing the set: Cutting before it’s firm leads to smears and messy edges.Chill until solid.
Variations You Can Try
- Peanut butter swirl: Melt 1/3 cup peanut butter and drizzle over the spread bark. Swirl with a toothpick before chilling.
- White chocolate drizzle:</-strong> Add a creamy contrast by drizzling melted white chocolate on top.
- Espresso kick: Stir 1/2 teaspoon instant espresso powder into the melted chocolate for a mocha vibe.
- Dark chocolate lovers: Use all bittersweet or 70% chocolate and add a touch more marshmallow for balance.
- Gluten-free option: Swap Golden Grahams for a certified gluten-free graham-style cereal.
- Salty crunch: Add crushed pretzels or roasted peanuts to the top.
- Holiday style: Sprinkle crushed peppermint candies in winter or colorful sprinkles for parties.
- Campfire finish: Briefly torch the top marshmallows with a kitchen torch for a toasted flavor. Keep the flame moving to avoid melting the chocolate underneath.
FAQ
Can I use only one type of chocolate?
Yes.
Using all semisweet keeps it balanced, while all milk chocolate makes it sweeter and creamier. If you go all dark chocolate, consider adding a little extra marshmallow or a drizzle of white chocolate to soften the bitterness.
How can I melt chocolate without a microwave?
Use a double boiler. Set a heatproof bowl over a pot with an inch of simmering water.
Stir until smooth, keeping the bowl away from direct steam to prevent water from getting into the chocolate.
Do I have to add oil to the chocolate?
No. It’s optional. A small amount helps the chocolate melt smoothly and cut cleanly, but it’s not required.
If your chocolate is already glossy and fluid, skip it.
My bark is crumbling—what went wrong?
Usually, there was too much cereal for the amount of chocolate, or it wasn’t fully set before breaking. Next time, add cereal gradually and stop when everything is well coated. Chill longer before cutting.
Can I make this ahead?
Absolutely.
Make it 1–2 days in advance and store it airtight. If it’s warm where you live, refrigerate and bring to room temperature before serving for the best texture.
How do I get clean, even pieces?
Chill until firm, then use a sharp chef’s knife to press straight down rather than sawing. Wipe the blade between cuts.
For a rustic look, just break it by hand.
What if I don’t have Golden Grahams?
Use broken graham crackers, Cinnamon Toast Crunch for a spiced twist, or any crunchy, lightly sweet cereal. Aim for bite-size pieces so the bark holds together.
Can I add more marshmallows on top?
Yes. Press a handful on after spreading, then gently tamp them into the warm chocolate so they adhere.
If you plan to torch them, do it quickly and carefully.
Is there a dairy-free option?
Use dairy-free chocolate chips and a dairy-free graham-style cereal. Check labels to ensure they’re certified vegan if needed. Coconut oil works well for smoothing the melt.
How thick should the bark be?
About 1/2 inch is ideal.
Too thin and it shatters; too thick and it’s hard to bite. Spread it evenly for consistent pieces.
In Conclusion
Smores Bark with Golden Grahams hits all the nostalgic notes of a campfire treat without the hassle. It’s quick, no bake, and easy to customize with your favorite add-ins.
Keep a batch on hand for last-minute guests or a cozy night in. One pan, a few pantry staples, and you’re set with a crunchy, gooey dessert everyone will love.
Printable Recipe Card
Want just the essential recipe details without scrolling through the article? Get our printable recipe card with just the ingredients and instructions.